Pages

Showing posts with label sewing. Show all posts

October 30, 2013

Let me count the ways...

Remember that Study Hall Jacket I can't get enough of?

Just to refresh your memory :

Version 1 (and 2)

Hello Kitty style (hood hiding)
I've made ANOTHER ONE!

A goddamn adorable one, amirite??
This time I opted for the ruffled welt pockets and ruffled collar.

I mentioned previously that I'm not in love with the pattern. And after making it four different times, in two different sizes, experimenting will all the different cuff, waistband, collar and pocket options...I am really not happy with this pattern.
I am also putting off writing a review so I can gestate a positive outlook and potential remedy. (Since I've already got plans to make 2 more of these gosh darn cute things for upcoming birthdays.)

All in time.

Enjoy the photo, and good luck with last minute Halloween preparation!

October 16, 2013

FO Backlog - Hello Kitty Hoodie

Not much time to write, but here are some pictures from my latest FO!

A Hello Kitty hoodie from the Pattern Anthology collection that was released a while ago. Guiltily, I have bought both collections released and am pretty damn sure I'll be buying their next one as well. (This time I'll remember to use the discount code, tho - whoops!)

To be totally honest, I'm not a huge fan of the pattern. I had a LOT of issues - but I won't get into it right now. However, there's no denying the end result!

Ta-da!

Mucked up this side's welt pocket, drat.

Rear View

Loving the ruched cuffs and waistband.
Looking at it now, I'd love to make it again with a fleecy white outer and adding ears and a bow a'la Hello Kitty - with a more subtle HK liner fabric. I definitely plan on sewing this pattern again (actually, this was my third go - see the Avengers jackets previous post) but with copious modifications from the original pattern.


October 10, 2013

FO Backlog - Avengers bomber jacket!

Just a quickie - here are some pictures of a recent FO. Two, actually!

My son's BEST friend had a birthday recently, so I decided to make use of my recently acquired Study Hall Jacket pattern and made matching Avengers jackets for the boys.

The freak-out factor was high on this.
Gotta say, it was a hit. The Avengers fabric is courtesy of Joann's and the sleeves are some old Ikea curtains I've been chopping up. I bought black ribbing and black fleece for the sleeves and interior - and it was totally worth it.

You can see his collar is sitting a little funny, but after some wearing and washing it looks way better. This is fresh off the machine - he couldn't wait to try it on - so the seams are fresh and visibly complaining. Of course I finished this morning of...'cuz that's how I roll.

BFFs 4 Lyfe

More soon!

August 12, 2013

FO : Baby doll knot top

What does one do on Sunday mornings, when everyone is sleeping?


Well I don't know about you, but apparently I sew.

A heart because a shrimp was too hard to applique. 
Thanks to some inspiration from a friend's Pinterest pick (yup, I'm still pretending that I don't need to open my own account) I fabricated this wee top yesterday. 

The original pin can be seen here.

(I'd out my friend but I figured I should ask her permission first)

Technically, not EVERYONE was asleep...

Q was supportive, however.

I didn't have quite enough yardage to make it a dress, unfortunately. 


Still working out the kinks, but it isn't too shabby! I had to move the buttonholes in towards the center a bit - after trying it on the kid I saw they were too far apart. 

Love those knots.

Oh yeah...although this sort of fits my baby girl (who's fat body I used to help me measure) it also fits my 4 yr old son! Who graciously allows me to use him as a little live dress form, AH DORABLE. His father will never let me take photos, though. (Not that I blame him.)

Thanks for bearing with the dry spell, guys. It's been a nutty summer but (as evidenced by this little number!) we're starting to acclimate to the new normal.

June 19, 2013

FO: Baby girl top

I saw the cutest picture, recently. Somebody blogged about an adorable shop selling adorable patterns of kids clothing. Can't find it for the life of me now.

Anyway - one top really stuck in my head. Too darn cute! So, sans pattern, I decided to give it a go.


Part of the reason why I am loving sewing so much lately is that my brain loves figuring out how to construct things I see. And sometimes it even works out! So I have to give the designer credit there, as soon as I can find her...

Would love to adapt it for myself.

June 18, 2013

FO: Baby Bow headband

Technically, I made the baby too.


That counts, right? :)

Just an easy bow with fold over elastic as the headband. I stitched the bow down over the FOE seam, so it's a smooth wear for those soft baby heads.

And sometimes my head.

March 22, 2013

Sewing FO: Bib Round 2

MORE BIBS!! 

Those burp clothes weren't enough - but they were great inspiration! I wanted to try out the hemming style I did on those with something more complex, like, a bib. 

Presto Bib-o
These bibs (like the cloths) are terry on top and linen on bottom. Since I'm terrible at pinning my new method is great because it completely avoids that. 

Basically, I sew the three layers with the patterned fabric strip on top, facing down. Then I fold that over the edge (revealing the pretty pattern!) and use a pretty stitch over what is now four layers to complete the hem and make it cute. (I will take process photos another time...this happened too fast!)

New sewing machine magic - pretty stitch pattern.


See? So pretty. 
I love it! My new favorite. 

March 20, 2013

Jute knee patches

Here we go, round two!

Some jute patches - that's more durable, right? They make carpets outta that stuff. 


Potato sack looking, eh. 
Don't worry, I didn't line them with jute! My son's knees are bruised plenty... Here's some soft felt and secret winter touches for your viewing pleasure. 


(Confession: I love inappropriately placed holiday attire. I met a new mommy-friend just a few weeks ago because she was wearing Halloween socks in public - and I was wearing Christmas ones! KISMET.) 

(Kismet doesn't insinuate anything romantic, does it? That would be wrong.) 

(Just checked, phew! We're safe. No romance needed.)

Let's see how long these suckers last. 

March 18, 2013

Sewing FO: Wet Dry Bag

So, I'm going back to work.

I am conditioned to insert a sad face after that statement, but I've decided there's no point in being prematurely dramatic so I'll save my moaning for when I actually have something to moan about. Who knows, maybe it'll be flawless? Knock on winking wood. :)

Anyway, as part of my return I'll be pumping milk. We've been exclusively breastfeeding ("WE?" Why did I type "we" when obviously I'm the only one with boobs. "I" have been exclusively breastfeeding.) and although I'm a bit nervous about the bottle transfer, we did a test run this week and so far silicon has replaced Mommy no problem.

(Another declined opportunity for sad face.)

The Medela I got is super cool - much better than the Lansinoh I used last time and so far, much more comfortable and productive. Only downer is I need a place to put the parts in between pumping. Tra-la! Perfect opportunity to make a wet-dry bag!

I've been dying to make one because they seem so ridiculously easy, and they are grossly over-priced. Since I have a ton of PUL (polyurethane) fabric courtesy of my diaper-making binge (tbb soon, promise) it's a no brainer. If you're previously unfamiliar with wet-dry bags, they are: waterproof zippered pouches for all sorts of things. Small ones are great as reusable snack bags, big ones for for swimsuits, and best of all they are great for dirty cloth diapers (how I came familiar with them). Since they run around $10-$30 and can be made for, oh, $5...it's a great project.

I found this amazing tutorial that gives step by step instructions with pictures (which I found via this incredible collection of resources for cloth diapering - GOLD MINE). Funnily, it was posted on one of my other favorite sewing blogs but I must have missed it. SO GLAD for that resource.

Not too bad, eh!

Now I'm all set to go. Now to find a private place to pump...!

March 11, 2013

Monster Face Pull-over

Another fun project with the kid!

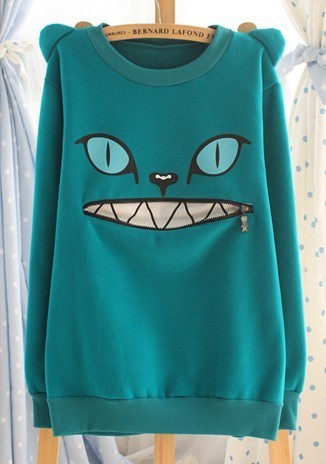
A few weeks ago I saw this on my Tumblr feed:

SAKUN cat sweater with zipper mouth
AMAZING! (Also, I am now in love with Korean fashion blog seoulrhythm. check it out.)

I showed the pictures to the kid and it was a hit. So, naturally, we made our own.

with a few changes...
A few things I learned about doing a project with your kid:

  • Plans go out the window I don't know about you, but my kid changes his mind every 5 seconds. I cut out the exact same shape of the cat eyes (in the same color!) only to have him ultimately decide to flip them upside down. He also decided that he wanted a giant brown nose. And then he didn't. Then he decided it was going to be a monster. The choices are endless - and I let him have free reign with creative choices so he feels like it is 'his' project. Ultimately, though, I have to cut it off so that we can actually finish the project. The key is trying to gauge that point correctly.
  • It will never be 'perfect' And it shouldn't be! Perfection usually comes at the price of many tears and your kid not getting to be as involved as s/he should be. I have to remind myself to not be worried about the end product - that kind of professionalism is lost on him anyway. 
  • Keep it cheap We made this out of scrap fabric, scrap thread, and a pull-over he is on the verge of outgrowing that is no longer a staple of his wardrobe. The only thing I actually bought was the zipper - $1.99 at JoAnn's. Since it's a novelty item and I wasn't sure if it would be successful or worn often, I couldn't afford to put much money (or time) into it. 


We had SO MUCH FUN. I couldn't get it completely finished before bedtime, but we had it all cut and pinned and I promised when he woke up it would be completely sewn. All in all it took just one evening.

And he won't stop wearing it. :)


March 8, 2013

Bib Frenzy

I made bibs!


Clearly, I am still on a sewing kick. Sorry guys, I promise I am still knitting. (Sewing is just so....immediately gratifying!)

We loaned some housing supplies to a friend for a month, and upon their return somehow came out with a few extra towels. They were nice enough but since we are already overflowing with towels I decided to try and repurpose them.

So many ideas for old towels:

  • bibs
  • burp cloths
  • door sweep
  • boot leg stuffers
  • scrub glove
  • hot pad (rice filled)
  • bean bag

...and who knows what else.

For my first go, I did bibs.


I just copied the shape from one of the baby's existing bibs and traced it onto the towels and some other stash fabric. Then I sewed on the hook and loop pieces in the appropriate places, and pinned the two pieces facing each other.  Sewed all around leaving a two inch gap, pulled the bib right-side-out, then seamed the gap.


For some reason I traced the bib a little large, and didn't end up sewing with as much seam allowance as I had planned (bad habits die hard). Consequently, the bibs came out larger than I planned. This made them a little awkward to wear, and the neck hole was too small on a few. Easy enough to remedy for next time.

Good thing I have an easy audience!

March 6, 2013

Destiny Fulfilled - Felted Knee Patch

Remember me joking about how this felt knee patch wouldn't last?

Here's the car after one wearing:

Little fingers love poking through little holes!

And predictably, this was the result:

Sad panda!

The patch tore off completely within one week of application.

Oh well!!

Working with the kid on projects like this is so fun. Creating something he asks for is like magic! But I guess the downside is there are a few extra tears when it is ruined. (Tears don't last too long though...he has already requested a 'purple house' for his next patch! This time I'll dig around for some more durable fabric, though.)

February 23, 2013

Another patch!

Since the little man requested a "red square" this time, I had to use felt (only red material on hand). Of course I decided to spiff it up a bit - how's about a race car, guys?

Criteria for car shape: needs wheels. The end.
I stitched this last weekend while some friends were over, and one of them jokingly commented that it would only be a matter of time before this, too, was torn open...which is unfortunately, undoubtedly true. Ah, boys! Good thing I enjoy doing these. :)

December 23, 2012

Believing in Christmas Crafts

To continue the tradition of adding to our home holiday decorations, this year I decided to make a skirt for our Christmas tree. Our old one got destroyed by the new pup last year and I still have scads of felt and festive fabric - so it was a no brainer.

Naturally, Reed figured there was no way I was going to get this done in any amount of reasonable time. So I struck him a deal - give me a day to get this underway and if I fail, he can go buy one.

Happy to say...I did it! Sort of. I got the fabric out and planned it, but didn't get it started until day 2 and finished until maybe day 5. But by then he was a believer and I'm glad - because I was able to customize it with things that are more important to us.

Like Batman!


Since I still don't have a ton of spare time I decided that this will be an ongoing on project. I got the basics down this year, and fully plan on embellishing more next year...and the next...etc. Eventually I'm hoping for a big, Christmas clusterf*ck. :)

Here are some more pictures of what I managed to get together for this year!

Trees on a tree skirt? How very...meta...

Domo-kun throwing snowballs


Ninja hiding among the gifts!

November 23, 2012

Mod: Kitchen Floor Mat

So, even though I am in the midst of sweater knitting frenzy I somehow found the time to finish up the kitchen floor mat modification I had been planning.

Well, in this picture, it's a quick steam/iron away from being finished.
[Please pardon all the dark crappy photos that are a direct result of completing the entire project late, late at night between feedings.]

The original mat was poop-brown and a total magnet for dirt, dog hair, and pilling. This didn't really bother me but

November 1, 2012

IANAOMS - Part III: Baby Hamper

The third project in my "I am not afraid of my Serger" series!

Now: After a day or two at home with the new baby I realized that *gasp* I had no place to put her dirty laundry!
(If you haven't had a baby this might sound silly to you. But think about it...would you want something with baby diarrhea/urine/milk barf etc. going into the same hamper that you use for, you know...clothes you care about? Yeah didn't think so.) (Oh yeah, and she gets special baby detergent.)

Since we have a *very* tiny home, space is always an issue. Comfortable living is only to be had by thinking creatively. The changing table was my first choice - here's the space I am working with:


Not a lot of room, but when you look from the top...

84 degrees in October *grumble grumble grumble*

There is a little gap! This will be perfect.

I set out to create a hanging hamper that would just fit in that spot. since that is where more of the dirty clothing is procured - and you'll note there are some really nice, rounded knobs at each corner of the table. Design was easy - I knew exactly what I wanted, and how to make it work with the Serger. Luckily I had some black thin corduroy for backing (to protect the table), stiff black mesh for the outer, puffed portion (the better to ventilate with) and some black elastic.

And when I figure out how to write sewing patterns I will get right on it! :)

Pictures of the final project:


I did have quite a bit of trouble getting the tension correct for edging. I think this is because I had it most recently set for the flatlock stitching I was doing on the quilt. In addition, the mesh did not want to behave at all, and although I was really excited to try and use the setting for differential feed I just could not get it to work for me. Perhaps the fabric's fault? Can't imagine mesh is ideal to work with. I actually gave up trying to get it right and just did gathers manually - hence the slight asymmetry. (Cuz pinning and ironing is a time luxury I can't afford right now. Deal with it.) I attached the elastic loops by hand.

All in all, the project only took an hour or two - and much of that time was spent trying to tweak the tension and practicing on scraps. Yikes! Hopefully it will start to come more naturally soon.

October 31, 2012

I am not afraid of my Serger Part II: Piecing The Quilt

I am still working on photos for this portion, so you'll have to do with words for now.

So: Once I finally had my arrangement decided upon, piecing was easy.

I followed the recommendation from the original pattern and just picked up pieces in a single row, then sewed them all together. Since I was working with the machine it made things a lot faster, which meant no need to carefully stack every row and place in labeled zip-lock bags - each row only took about 5 minutes or so to piece together! I tested out the style of stitching I wanted with some scrap pieces beforehand and was able to get some nice looking ladders:

Using this blog post as a guide to flatlock stiching, I was even able to emulate the look from the original pattern! (Which is all hand stitched...admirable or masochistic, you decide.)

Once I finished piecing all the strips I ironed them out and miraculously, they are all pretty much the same length. I was careful when building the pattern to find pieces that added up to the same length - glad to see that it actually worked out.


Although it was super tempting to just continue to work and try to finish the quilt, I had already spent an exorbitant amount of time on this project and my son needed to go to sleep (which means no more machine running...we have a very small house).

Funnily enough, I went into labor this night. One of the first things I thought when I woke up with contractions was "But my quilt!! I wanted to finish that today!!" I was so disappointed!! So, we'll see when I get time to put the final touches on this. The great news, however, is that when my step-dad came to see the new baby he brought our old Singer sewing machine with him! So I will have no problem finishing all the non-Serger aspects of this baby. (I was really scratching my head about how to border this thing...ever impatient am I.)


October 29, 2012

I am not afraid of my Serger Part II: Practicing With Felt

I recently inherited several boxes of fabric, one of which consisted entirely of felt. A few new pieces but mostly ends and scraps and strange bits. I knew this would be perfect for meditation and practicing some more Serger action, but I didn't know exactly how.

I adore Purl Bee for all their amazing patterns and fabrics, so this was the logical place to look for inspiration. They even have a section of felt projects, which made it really easy to browse. After considering coasters, placemats, bean bags, and a memory card game I finally settled on this quilt as a guide:


Because why have a bunch of useless bean bags when you can have one useless quilt? :)

So far I've managed to cut a million squares, iron them, and arrange them into a pattern I think I can like. Since this is basically just to keep me moderately occupied (I'm at home waiting for a baby to fall out of me) and to get some extra practice with the machine, it's nice to not have to worry about being precise.

Also, cutting through felt with a rolling cutter is so incredibly gratifying. I cleared the box in no time at all - look at how many squares I had!

ok, it's hard to tell. but those stacks are really high! 

Here's a picture of the arrangement I settled on. Can't wait to start sewing.

The black triangles are covering some of my slightly inadequate squares.


Update: If you've been attentive you will have seen that the baby DID fall out of me...so whaaa? I write posts in advance and schedule them for later publishing...that's why the time warp. Funnily enough, I went into labor the night I was putting this together.

October 17, 2012

I am not afraid of my Serger: Part I - Yoga Ball Cover

My husband bought me a Singer Serger sewing machine for mother's day. I was so stoked - thinking of all the amazing things I could do with it! Fast forward 1.5 years later and the thing is still in the box it got shipped in.

Or should I say was in the box - now it is out! And has even been used! Here's how. 

I bought the same one for my mother that mother's day as well, and although she actually opened the box she was in the same position as me. Too many options! So many words! What a big instruction booklet! Where do I start? Scary stuff. She just came down to visit and I decided it was time...I found an instructional DVD in the package and we sat down and watched the whole thing. (Ok, like 20 minutes. Nothing drastic.)

Not at all scary!

Although we were both kind of shocked to learn that this machine wouldn't be 'replacing' anything...it is supposed to be used in conjunction with a regular machine. Whoops. (No biggie though...we've been taking turns borrowing her Amazing and Irreplaceable Singer from the 70s since I was a kid. Although for a minute my husband freaked "You mean you're going to need to buy ANOTHER sewing machine?!?")

I already knew my first project - a cover for my yoga ball! Also known as a birthing ball or exercise ball, depending on what you're using it for. It will probably be a birthing ball sometime in the next few weeks, and then after that a baby-bouncing ball. Truly never has been a yoga ball, dunno why that's my term of choice. 

Anyway I digress. My doula has a fantastic cover and I inquired where she got it - a friend who makes and sells them for $30. $30!? But I have a serger! And 6 boxes of fabric waiting to be used! And the wonderful internet, who provides information like an easy pattern for sewing such simple awesome things! Check out the blog post I found that describes all you need to know here. 

Stash fabrics and simple sewing - perfect project. Here's my first go, using some funky 70s floral and a blue linen strip.


giant blue slingshot?

the strap!

SO! One project under my belt, gotta say I'm really pleased. It isn't bad for a first go. Next time I will definitely use a stretchy fabric (don't think I have any swimsuit fabric on hand, like the original blogger suggests) and probably go with a shorter strap.